OVHcloud Managed Kubernetes with Terraform: from state to cluster
Most Terraform walkthroughs start after the state problem is solved. This one starts before it, with an empty OVHcloud project and nowhere to put the state file yet.
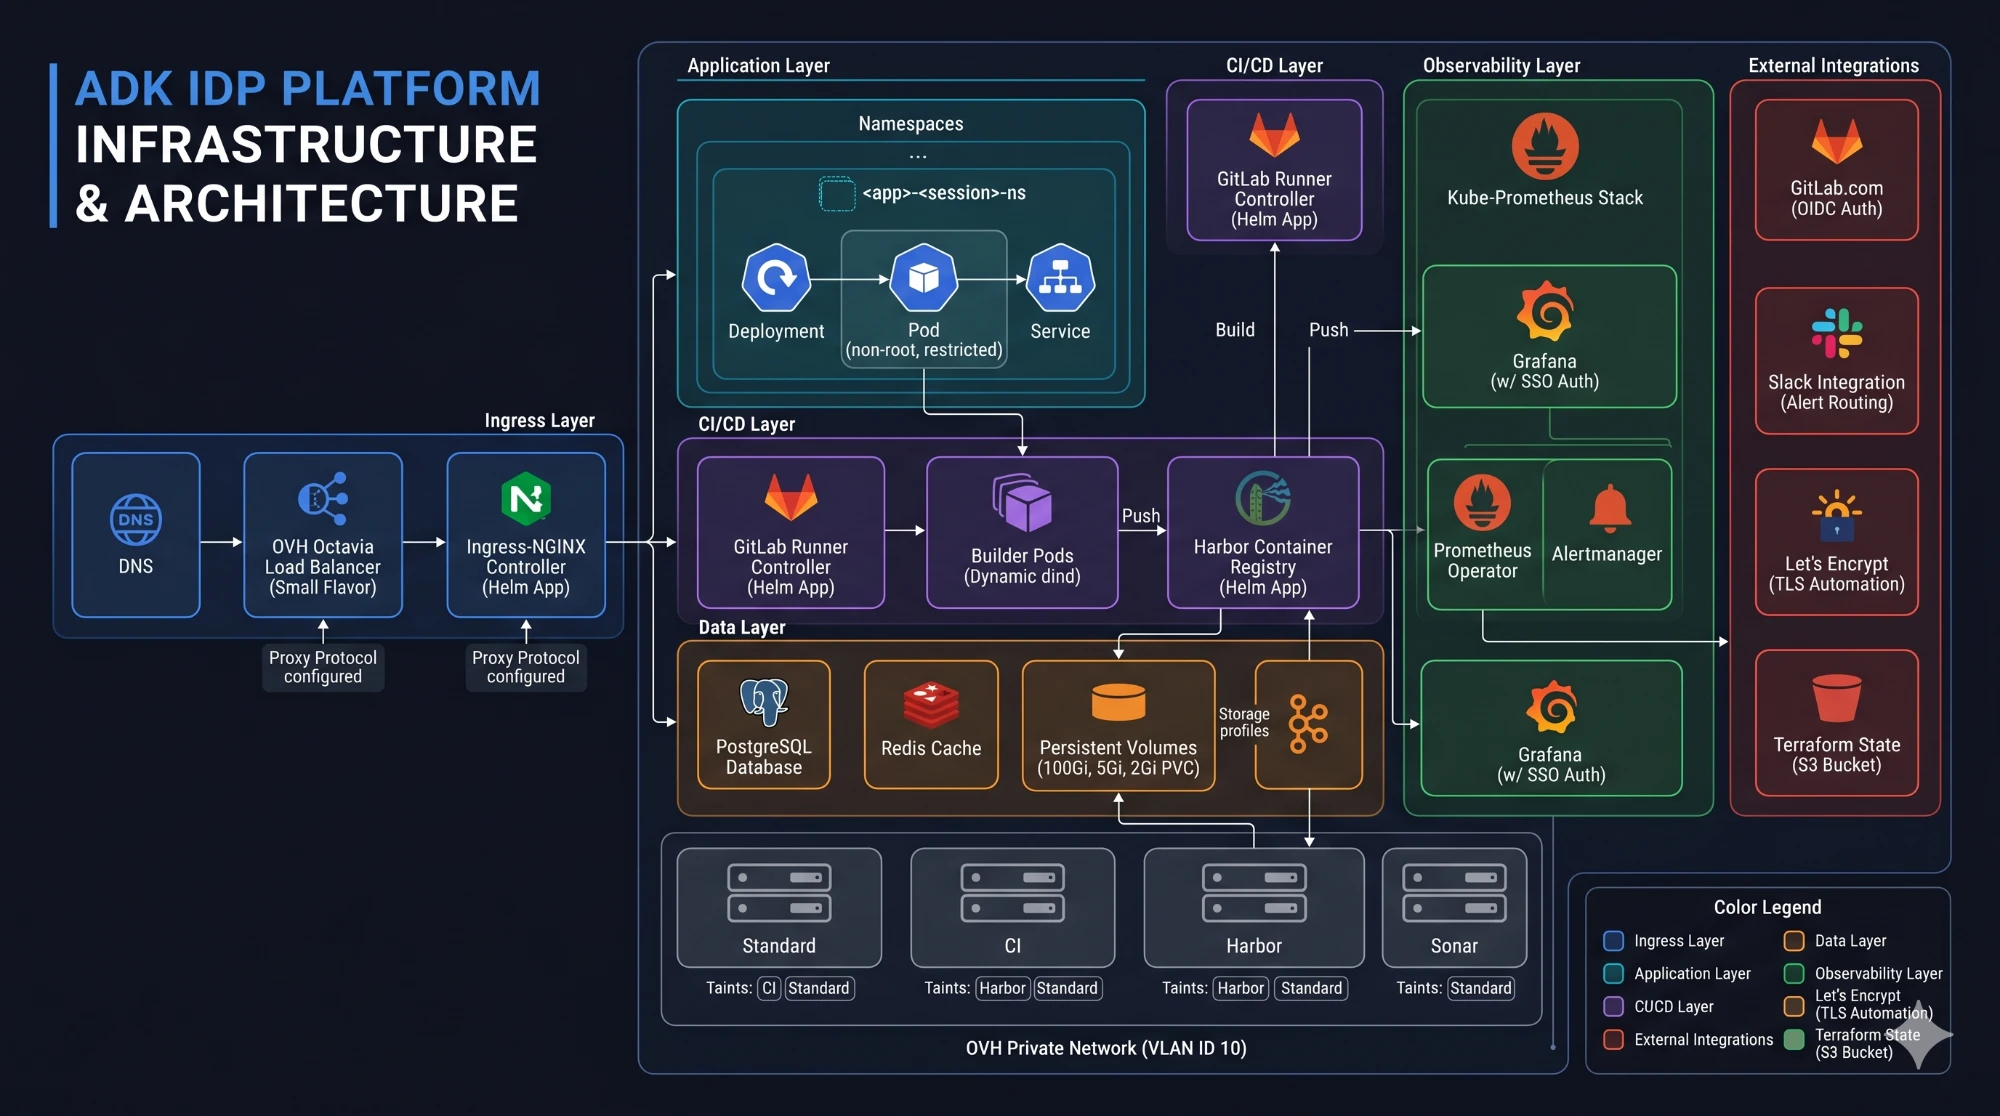
You are about to create a Kubernetes cluster with Terraform, and the first thing Terraform wants to know is where to keep its state. The sensible answer is a bucket. That bucket does not exist yet, and the thing that would create it is the Terraform you are trying to run.
That knot is where the internal developer platform we built on OVHcloud in 2026 started. By the end of this article you will know how we got out of it, how we keep a heavy build from starving a running application, and what OVHcloud hands you compared with what you still have to build yourself.
Part 2 of six. You don't need the other parts to follow this one.
Creating the OVHcloud object storage Terraform needs
The first dependency appears before the OVHcloud Managed Kubernetes cluster exists. We want Terraform state in remote object storage, but we also want Terraform to create that storage.
We split the work into two configurations.
The bootstrap configuration runs locally with local state. It creates the OVHcloud Object Storage bucket and credentials for accessing it. The Kubernetes configuration then uses that bucket through an S3-compatible backend.
That keeps the initial storage setup separate from the infrastructure lifecycle that runs through CI.
The bootstrap assigns OVHcloud's objectstore_operator role and configures bucket access for the required object operations, along with bucket listing and location lookup.
Remote storage gives the Kubernetes configuration a shared location for its state. The backend has no state locking, so only one Terraform run should touch the state at a time.
Giving CI and platform services their own node pools
A container build and an application serving requests have different resource patterns. We separated the workloads across four OVHcloud node pools:
| Pool | Intended workloads | Taint |
|---|---|---|
| General | Application workloads and platform services without a dedicated pool | None |
| CI | GitLab CI workloads | workload=ci:NoSchedule |
| Harbor | Core registry components (core, registry, database, Redis, Trivy) | workload=harbor:NoSchedule |
| Sonar | SonarQube and its database | workload=sonar:NoSchedule |
The taints prevent pods without a matching toleration from being scheduled onto the specialised pools. The service configuration uses node selectors and tolerations to place the intended workloads there.
For the runner pool, the Terraform configuration sets a minimum of one node and a maximum of five:
resource "ovh_cloud_project_kube_nodepool" "runner_node_pool" {
  name          = "${var.team}-${var.project_name}-runner-node-pool"
  flavor_name   = "b2-7"
  min_nodes     = 1
  max_nodes     = 5
  desired_nodes = 1
  autoscale     = true

  template {
    spec {
      taints = [
        { key = "workload", value = "ci", effect = "NoSchedule" }
      ]
    }
  }
}
All four pools use OVHcloud autoscaling and hourly billing. The runner pool can scale within its configured bounds, but it does not scale to zero.
This separation carries through into part 4, where the GitLab Runner, Harbor and SonarQube configurations select their corresponding pools.
Connecting the OVHcloud Managed Kubernetes cluster to its network
Terraform also defines an OVHcloud private network, subnet and gateway. The Kubernetes resource references the private network and subnet directly.
resource "ovh_cloud_project_network_private" "mks-private-network" {
  name    = "${var.team}-${var.project_name}-pn"
  regions = [var.region]
  vlan_id = 10
}
A private network on its own doesn't make the cluster private. In this implementation, private_network_routing_as_default is set to false, so the private network is not the default route for outbound traffic.
What the private network does give us is a defined path for traffic between nodes and a single gateway for outbound connections. What it does not give us on its own is a cluster closed off from the public internet. That takes configuration beyond what this setup applies.
Application ingress and workload network policies are configured in the layers above this foundation.
Checking changes before applying them
The GitLab pipeline runs Terraform formatting checks, validation and planning. The plan job saves its output as an artifact.
Applying that plan is a separate, manual job restricted to main. The job uses the saved plan, giving the reviewer a specific set of infrastructure changes to inspect before execution.
After a successful apply, the pipeline makes the generated kubeconfig available as an artifact for the bootstrap jobs. Those jobs use it to connect to the cluster, inject credentials and install Argo CD.
Terraform provisions the infrastructure, while the next stage connects it to the platform configuration in Git.
Our article on testing Terraform code with static analysis tools explores the checking side in more detail. In this experiment, the pipeline establishes the formatting, validation, plan and manual-apply sequence.
Supplying platform credentials outside Terraform resources
The platform services need credentials, including repository access, the GitLab runner token and Harbor's admin password.
We supply these through GitLab CI variables and create or update Kubernetes Secrets during bootstrap. The platform manifests reference the resulting Secrets.
That avoids managing these particular Kubernetes Secrets through Terraform and recording their values as Terraform-managed secret resources. The Terraform state still holds sensitive data such as cluster access, so treat the state bucket accordingly.
The environment we built this on is no longer running. The code is public, so you can read the architecture and the decisions behind it.
What OVHcloud gives you, and what you build yourself
The foundation above is specific to OVHcloud Managed Kubernetes, so it is worth saying plainly which parts the platform handles and which parts stay yours.
What OVHcloud gives you is the part you would otherwise build yourself: a managed control plane, autoscaling node pools, object storage for Terraform state, private networking and a managed load balancer, all driven by a Terraform provider that covers them.
What you give up is the long tail. There is no managed container registry in this setup, which is why we run Harbor ourselves on its own node pool. The missing state locking from earlier counts here too: keeping to one Terraform run at a time is your pipeline's job, not the platform's. And the monitoring configuration needs adjusting, because a managed control plane does not expose the components a default kube-prometheus-stack expects to scrape.
None of that is a reason to avoid OVHcloud. It is the trade you make: fewer managed services to lean on, and in return a cluster whose every part is described in the Terraform you just read.
This credential injection is the starting point for part 3. Once the cluster exists, the pipeline supplies the credentials, installs Argo CD and applies the root Application.
You can follow the infrastructure configuration in the GitHub repository. Next, we hand that foundation over to Argo CD.
The full series
- AI platform engineering on OVHcloud: an internal developer platform experiment
- OVHcloud Managed Kubernetes with Terraform: from state to cluster
- Argo CD app of apps: from an empty cluster to platform services
- Harbor container registry and GitLab CI: from build to Kubernetes
- Golden paths: what should an AI agent be allowed to change?
- Google ADK agents for app onboarding: where human review fits

Cis Verbruggen